Saturday 12 May 2018

Easy Eggless Flower Bread

This flower bread happened by chance! I was desperate to bake my own bread. However, I had not yet purchased a loaf tin, nor did I have a big baking tray (haven't yet found a round one for my microwave). But, when there is a will there is a way. So, we baked it in our flower shaped aluminium cake tin!

With this bread, I resumed baking after 14 years. Read more about it here.

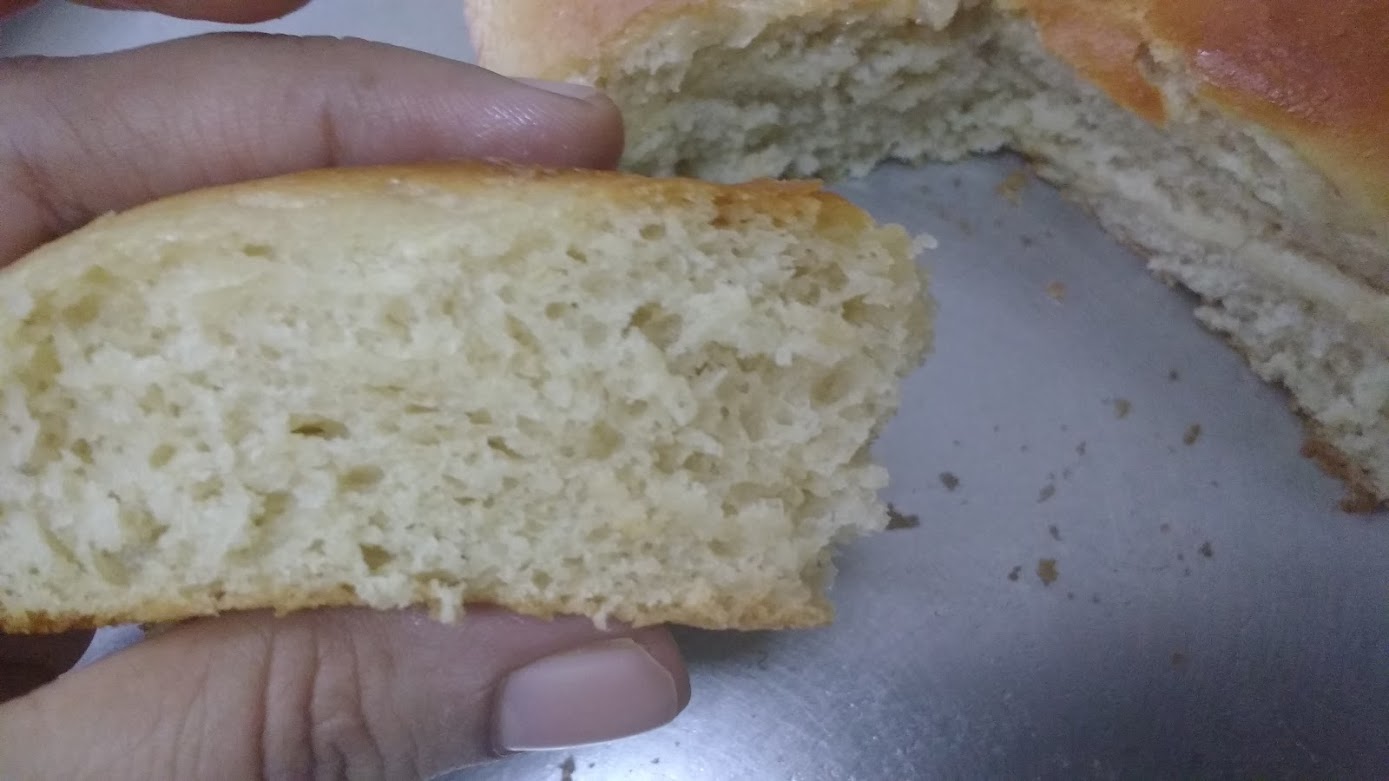
This bread is ideal for tea time. Blame it on our excitement, we enjoyed it with a generous layer of butter and it vanished from the table in few minutes! Despite all the hard work, all I got of the bread was one petal. But that also proves the bread was indeed yum.

Well, without anymore bak bak, let me get onto the recipe.

Ingredients (Made a six petal flower bread)
All purpose flour/Maida - 1 Cup 
Instant Dry Yeast - 1 tsp
Sugar - 1 tsp
Salt - 3/4 tsp
Lukewarm milk - 1/2 Cup
Lukewarm water - 1/2 Cup
Clarified butter/Desi Ghee - 1 tbsp + 1/2 tbsp for brushing
Milk - 2 tbsp, for milkwash

Method 

1. In a bowl, take sugar, yeast and add lukewarm water. Cover and rest for 10 minutes for the yeast to activate. Do not move or uncover the bowl while resting. Also, the water should be lukewarm. Too hot or cold water won't activate the yeast and the bread won't rise.

After 10 minutes, the yeast rose and looked like this. 

2. In a separate vessel (since I don't have a big working board, my humble Paraat which I used to knead the chapati dough came handy) take the maida.

3. Add the salt and mix well.

4. Knead a soft dough using lukewarm milk. Preparing the dough is an important step and thankfully, my MIL volunteers for the job and completes it to perfection. She knead the dough for a good 7-8 minutes. The dough started sticking but she continued to knead and we eventually got a soft dough.

5. Add 1 tbsp desi ghee and knead the dough well so that the ghee gets absorbed. This gives a very soft texture to the bread. In fact, we do this even with our chapati dough. Make the dough into a ball. 

6. Cover the dough with a moist cloth and keep in a warm place undisturbed for 2 hours to prove. 

Our dough doubled beautifully after 2 hours.

7. Take the dough in the Paraat and knock off the excess air. 

8. Grease the tin.

9. Put the dough in the greased tin and make small cuts with scissors to give the shape of petals. 


10. Cover with a damp cloth and keep for proving for another 30 minutes.

11. Give milk wash.

12. Bake in a preheated oven at 200 degrees Celsius for 20 minutes.

13. Loosen the sides with a knife and smear ghee while the bread is still hot.


14. Cool for 15 minutes. Cut into petals and enjoy with butter!


Wednesday 9 May 2018

My second innings in baking


Top post on IndiBlogger, the biggest community of Indian Bloggers


No matter how awesome breads I may bake in the future, this bread will always be the closest to my heart! Because with this bread, I resumed baking after 14 long years. Curious? 

Well, let me kill the curiosity..

I am a Hotel Management graduate. Obviously, as part of the curriculum, I learnt to bake so many cakes, breads and cookies. However, it was total "egg" cooking. Those days we were so much obsessed with having a good career that we just focussed on the destination, not the journey. As a result baking was a very procedural thing to get the right grades. Of course, those who wanted to be professional chefs did have a different approach towards the classes. But since those days I was more keen on pursuing MBA after college and wanted to make a career in marketing and communication, baking was a mere task for me which I had to complete perfectly just to get good grades. How foolish of me na! Yes, after 14 years even I think so. But there is a saying that experience is like a comb that life gives when you go bald! So no point hind sighting.

So, what is it that has suddenly transformed me into a crazy baker? 

Well, motherhood is the answer. I once wrote a post on the things motherhood taught me that nothing else did and today I proudly add baking to that list. I wanted to introduce breads to my toddler son. However, I was skeptical about the ingredients used in the commercially available bread. Finally, my chef apron and the baking journals came to my rescue! The Microwave is all smiles as it is finally getting the attention it has deserved all these years. 

Since I have long stopped eating eggs, this second innings in baking is going to be completely eggless! Therefore, I feel like a First year student again, as I research on the ways to get the best results without using eggs.

Sometimes, small initiatives give us so much joy that even money can't buy! The joy of seeing my little one cherish the breads/cakes baked by me is something words cannot explain. 

Such is the magic of motherhood!

Monday 7 May 2018

Easy Instant Dhokla

I have a childhood connection with Dhokla. In Delhi, whenever we had unannounced army of guests (I say army because kids those days accompanied their parents, unlike these days when kids prefer gadgets to get togethers) usually chai would be prepared at home and snacks ordered from the local market. Most often, the snacks ordered would be piping hot Samosas, Jalebis and Dhokla! 

I remember there was a sweet shop (Aggarwal Sweets) in Munirka, Delhi and whenever Papa and I would pass by, we would get at least half a kilo Dhokla packed and then enjoy at home with Chai! Our taste buds were so used to the Dhokla from our favourite shops that while in Delhi, we never ever felt the need to prepare Dhokla at home!

However, after I moved to Mumbai, like most other foods, I found a difference in the Dhokla served here. Blame it on the numerous places where I tried the Dhokla, but I found the Mumbai walla Dhokla a bit dry and less spongy than its Delhi counterpart. As a popular Hindi saying goes, "Marta Kya na karta", my MIL got into crazy Dhokla experiments and we almost got used to being the guinea pigs of her experiments.

Finally, my dream of having Dhokla of my choice came true when I purchased an Aluminium Cake tin recently. So desperate were we to have Dhokla that we inaugurated the tin with Dhokla instead of a cake! How funny is that! Using an Aluminium tin gave us the desired results as the tin heats faster. 

Here's how we got our instant spongy Dhokla!

Ingredients

Besan/Gramflour - 1 Cup
Semolina/Suji - 2tbsp
Curd/Dahi (Preferably sour) - 3/4 Cup
Turmeric Powder/Haldi - 1 tsp
Salt/Namak - to taste
Vegetable Oil - 2 tbsp
Lemon Juice - juice of 2 lemons
Eno/fruit salt - 1 sachet
Mustard Seeds/Sarson - 1 tsp
Curry leaves/Kadi Patta - 8-10
Green Chillies/Hari Mirch - 2-3, chopped
Green Coriander - 2tbsp, chopped, for garnish
Sugar - 2-3tsp
Water - 1 Cup

Method - 

1. In a mixing bowl, take curd.

2. Add the gramflour, semolina, salt and turmeric powder.


3. Mix well to form a smooth batter. If the batter is thick, some lukewarm water can be added to adjust the consistency.

4. Add 1 tbsp vegetable oil and juice of 1 lemon. Mix well and rest for 20-30 minutes. 


6. Boil water in a steamer (I used pressure cooker cooker and kept a stand inside). Add 1 sachet Eno to the batter and just slightly fold in one direction. Pour the batter immediately in a greased Aluminium cake tin and steam for 15 minutes on high flame or till the knife poked in the Dhokla comes out clean. 


7. For the tempering, heat 1 tbsp oil. Add mustard seeds, green chillies and chopped curry leaves. 


8. Once they splutter, add 1 cup water. Mix well and bring to a boil. 

9. Add 2-3 tsp sugar (or to taste) and juice of 1 lemon. 

10. Cut the cooled Dhokla into pieces and pour the tadka on it. Garnish with chopped coriander (I haven't as my son doesn't like coriander). 


Thursday 3 May 2018

Easy Eggless Mango Cake


Sometimes, husband's care can scare! 

Yes, you heard me right! But before you begin to judge me as an insensitive wife, let me tell you the story...

Few days ago, when Mr. Hubby returned from a trip, he surprised us with the souvenir. Not one, not two but 12 Kg Mangoes! In the great Gabbar Singh's style, I said, "Aadmi 3.5 aur aam 12kg!" Haha! Well, MIL and I immediately got into the Mango mode. The refrigerator's vegetable basket was vacated for these guests, while the veggies made faces as they were given "Desh Nikala" and had to spend the night out in the warmth. 

Such was the Mango pressure that till late night, all MIL and I discussed was how to use these Mangoes. From Aam Panna to Mango ice cream, all options were explored. Next day being a Sunday, the baker in me came alive, as I had babysitter support (Mr. Hubby). "Let's bake a Mango Cake!" I suggested and my partner in crime, my MIL was too happy to help.

Ingredients
Mango - 1 large
Grain Sugar - 1/4 Cup
Refined Flour (Maida) - 1 1/2 Cup
Baking Powder - 1 tsp
Baking Soda - 1/2 tsp
Melted Butter (we used Amul Salted butter) - 1/2 Cup
Condensed Milk - 3/4 Cup
Vanilla/Mango Essence - 1/4 tsp
Warm milk with cream - 3-4 tbsp

Method 

1. Take out the pulp from Mango and blend to a smooth puree along with the sugar. (The whitish thing in the pic is malai that accidentally dropped in the mixing bowl.

2. In a mixing bowl, take the Mango puree. Add the melted butter, condensed milk, Vanilla/Mango essence and mix well. (I didn't use the essence as Mr. Hubby wanted original flavour of Mangoes. However, the next time I prepare the cake, I will definitely add the essence as the cake tastes better with it.)


3. Sieve together the refined flour, baking powder and baking soda.


4. Add the sieved flour to the mango mixture and fold gently into a smooth batter. The batter should neither be too thin nor thick, just smooth flowing batter like the Pakoda/fritter batter. While the batter should be mixed well to avoid lumps, avoid over mixing as the cake won't rise then.

5. Grease an aluminium cake tin and dust some refined flour on the base as well as on sides.

6. Pour the batter into the cake tin and level the batter with a spoon/by tapping the tin.

7. We had preheated the oven (convection mode in microwave) to 200 degrees since I have observed the temperature falls by 10-20 degrees while I place the tin inside the oven and set the temperature and time for baking. By the time I did so, the temperature had already fallen to 180 degrees which was the required temperature. 
Bake the cake at 180 degrees for 25 minutes.

8. Remove the cake and check by inserting a knife. If the knife comes clean, then the cake is done. As you can see in the pic, I have stabbed the cake (as Mr. Hubby described it) right in the centre.

9. Cool for 20-25 minutes and enjoy with tea or with frosting of your choice. 


See for yourself how soft and fluffy the cake is!